Bitcoin Mining Continued — ASIC

This post will discuss ASIC based miners. These are currently the latest technology in the ongoing evolution of mining hardware. Primarily ASIC are used to mine SHA256 based coins, Bitcoin (BTC) being the most prominent along with Bitcoin Cash (BCH). There are others, but again I am going to go over the most popular.

The largest supplier of ASIC based hardware is Bitmain. Bitmain is a huge Chinese company that not only produces miners, but runs huge mining pools as well as producing AI hardware and many other products. They are also a large backer in Bitcoin Cash which has stirred a lot of controversy, but I’ll save that drama for another time.

Previously I had explained that mining hardware is in a constant state of evolution, hardware manufacturers are always improving the hashrate (amount of work a miner can do) which in turn with an ever increasing amount of miners causes the coin network’s difficulty to go up. This reduces the miner effectiveness creating a cycle of larger numbers of miners being deployed and more powerful miners being produced. A bit of a cold war if you will, each side is constantly escalating.

At the heart of an ASIC miner is its namesake numerous ASIC chips mounted on hashboards. These chips perform the intense mathematical calculations required to mine data for the network. Again Bitmain is the leader in this area producing their Antminer S9 brand which currently rated at 13.5 TH/s. That is 13.5 terahashes or 1,000,000,000,000 per second! Bitmain manages to pack 189 BM1387 chips on to three hash cards. These little chips are based on a 16nm (nanometer) die. Rumors are Bitmain will go smaller soon to shove more chips in the same space and release even more powerful miners.

Bitmain S9
s9

ASIC mining farm
bitcoin mining

These chips running at full tilt create an enormous amount of heat, requiring to very powerful (and loud!) fans to move enough air to keep them cool. A single Bitmain S9 creates roughly 5,000 BTU at full power and moves ~ 225 CFM of air. To put that in comparison, that’s roughly 2-3 times more airflow than a bathroom fan and outputs enough BTU to heat a 10×14 sq/ft room! All this requires an enormous amount of electricity, these miners generally consume around 1400 watts at 220v which is roughly 6.4 amps. Now imagine large commercial mining operations running thousands of these.

Being the adventurous (more like dumb) I’ve picked up several ASIC based miners as I like the technology and profitability.
To start off my mining foray I picked up a used Bitmain S7 from eBay. Then quickly followed that up with 2 new S9s from Bitmain. At the time of this writing all 3 are happily mining with 2 more Pangolominer M3s on the way.

My current miner setup
20180121_014931864_iOS (2)

* Need a way to buy/sell Crypto? Robinhood is one option Coinbase is another

* If you want to use an exchange that offers tons of different coins Binance is a solid option

Bitcoin Mining, a bit of a Detour From the Usual

If you thought this site was automotive focused you’d be right. But being a constant tinkerer and tech geek I have to share another project/hobby. Cryptocurrency, yep, pretty much everyone has heard of Bitcoin lately with it surging wildly in price and people debating if it’s even a real currency vs. some sort of scam. Personally I believe in it, I think Bitcoin and all the other associated coins and technologies are the future. Privacy, decentralization, etc., etc. are very real.

**However** before we go any further I want to preface this post with two items.

1. I am purposely keeping my explanations at a very high conceptual level, so I might lose some of the fine grain tech detail, but I’d rather do that than lose you in an overwhelming firehose blast of information. So if you’re a techie bear with me.
2. Also I am not going to include detailed setup instructions in this post, it would be too long and tedious of a read. But I do plan on diving in much deeper in individual follow-up postings.

With that said, what intrigues me most about Bitcoin and the plethora of other coins out there is mining. What is mining? Good question, the most basic explanation is that mining supports the coin’s network. It also discovers new coins (hence the name), but the main function is to verify transactions as they fly around the world from one person or business to another. Let’s say you decide to send me a Bitcoin (woot! That’s like $14,000.00 at the time of this writing). That transaction along with many others gets bundled up and put on the network. Miners then download those bundles run through very mathematically intense calculations and return the results. Once a certain number of miners submit matching results that transaction is confirmed and my receipt of the Bitcoin is verified. Here’s a couple of jumping off points in your journey to understand what the hell I’m talking about.

Bitcoin Wikipedia

OR

A much more user friendly explanation

Because different digital currencies use different algorithms hardware to mine these coins has evolved and diverged. Bitcoin and a few others for example use the SHA-256 algorithm, so to mine (support the network) you need SHA-256 equipment. Early on basic PCs could perform this task, but the network size and “difficulty” have risen exponentially resulting in the switch to GPUs and presently purpose built ASIC based mining machines. Not to worry though, you can still use GPUs (computer graphics cards) to mine some “alt” coins, there are also a few where you can still mine with your CPU. I’ve used several different pieces of mining hardware and software and that is what I’d like to report on in this first post.
I’ll talk a bit about each of the methods, CPU, GPU, and finally ASIC mining. Note: there’s others, but these are most popular.


CPU Mining

CPU mining, the most readily available, and arguably cheapest way to get going. After all most everyone has a PC or laptop sitting around doing nothing most of the day. So how do you get started? First you need to pick a coin, keep in mind this can be the toughest part. I like using http://cpucoinlist.com/ as one resource, but you can also find a coin by something you are interested in. I chose AEON , its main philosophy is to be a lightweight mobile friendly privacy based coin.


Initial Setup

OK, now that I’ve chosen a coin I have to get two things going. 1) The software to mine it with my CPU and 2) A wallet to hold the currency. Wallet? Yeah all this way in and I am still throwing new things at you! Basic concept of a wallet is that it stores the private keys of your digital currency https://en.wikipedia.org/wiki/Bitcoin#Wallets these private keys are unique to your currency and must be very well protected. If they are lost, stolen, or destroyed so are your hard earned coins!! Generally the coin you choose will have wallet software on their website. The difficulty in setting up these wallets varies greatly so use this as a determining factor of what to mine as well. In addition to running a piece of software on your PC there are other wallet options as well. For my “mainstream” coins like Bitcoin, Litecoin, Ripple, and Ethereum personally I like the Ledger Nano S it is a type of wallet known as a hardware wallet.


Let’s Mine!

With all of that out of the way I can now get going on the main task, CPU mining for coins. Choosing AEON meant that I had to find software that matches the coin’s algorithm. AEON uses the CryptoNite-Lite algorithm to verify its transactions (there’s so much more to it, but let’s keep this high level). I chose xmrig as my AEON mining software. It’s not for the faint of heart to set up, but once you do it works really well. As mentioned at the start I will published an in-depth setup guide for this at a later date so keep checking back! Below is what the software looks like in action.

cpu mining

Notice there’s something called a pool in there, a pool is again at a basic level, a group of miners putting their resources together to increase luck and profitability. https://en.wikipedia.org/wiki/Bitcoin#Pooled_mining


GPU Mining

Up next is GPU mining, GPU mining has exploded in popularity. Graphics cards can be immensely powerful tools in certain applications, and cryptocurrency mining is one of them. The most popular coin being mined with GPUs is Ethereum. https://en.wikipedia.org/wiki/Ethereum Just like CPU mining you’ll need to find software that will use your computer’s graphics card to perform mining actions for the coin you chose. One very popular piece of GPU mining software is Claymore’s Just like CPU mining you’ll also want to use a wallet to store your Ethereum and find a mining pool. I use the previously mentioned Ledger Nano S hardware wallet and https://ethermine.org as my mining pool. Here is a sample screenshot of Claymore’s miner in action.

gpu mining


ASIC Mining

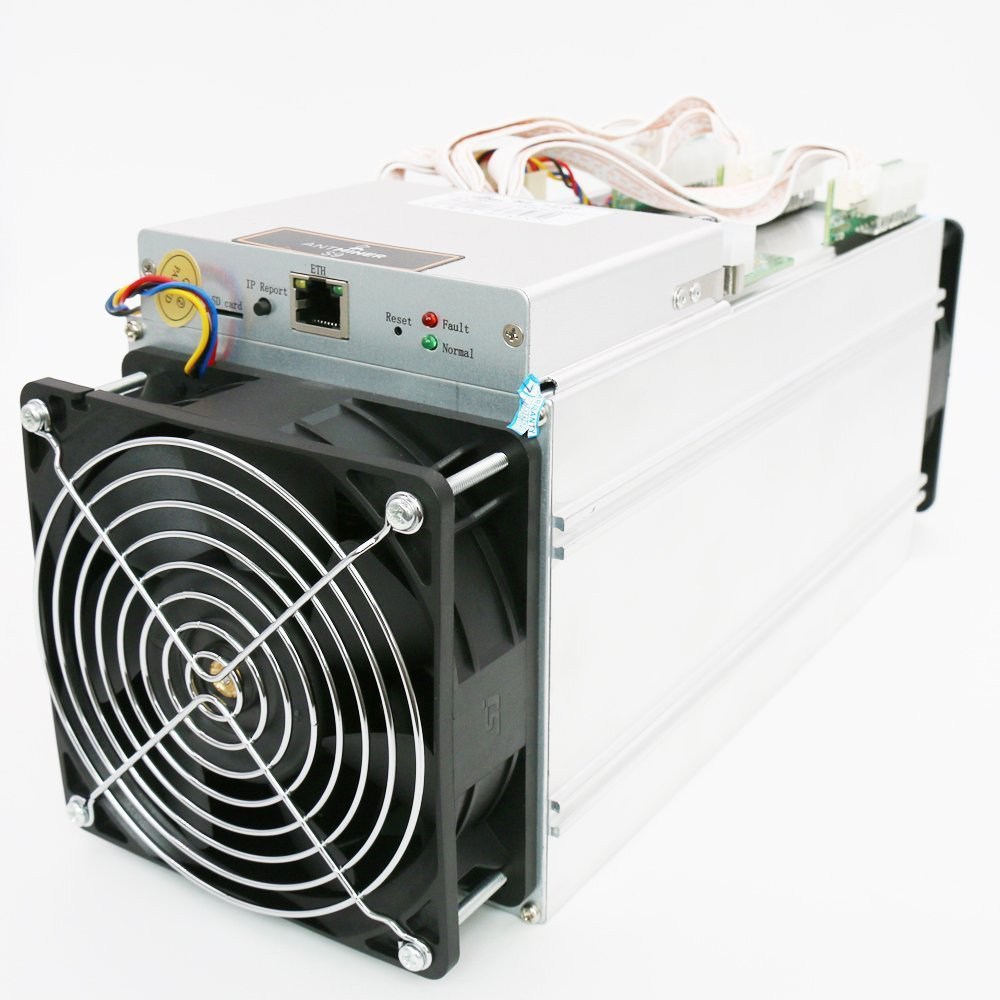
Next up is mining with purpose built devices known as ASIC miners https://en.bitcoin.it/wiki/ASIC. These are full on single purpose industrial miners. I use the term industrial as they are incredibly loud, power hungry, and produce an immense amount of heat. The Bitmain S9 is currently the king of available miners. It uses roughly 6.4A (1400 watts) of power on a 220V circuit, produces about 5,000 BTU of heat, and is approx. 78 decibels loud when standing next to it. While the other forms of mining can easily be done at home, ASIC mining poses unique challenges given the information above. So if you plan on trying this at home know that you’ll need an area well away or insulated from the rest of your house. You’ll need a sufficient 220v 20A circuit and a way to evacuate a large amount of hot air. So be prepared and do your research!

s9

That is a very quick high level overview. Stay tuned for detailed write ups of all 3 forms of mining I have mentioned. Having done all 3 I will dive deeper in to each method.


Finished! Custom Carbon Fiber Fuse/Relay Center With 6061 Aluminum Bracket

After deciding to not share any of the stock vehicle wiring with the Megasquirt Fuel Injection system being installed in my 1995 Lightning project it was time to build a custom fuse and relay center. There really were no affordable off the shelf setups so I began piecing one together that met my needs. 1st and foremost you need to properly plan for two items. One, what is the total amount of current you will run through the setup and two will you be using negative triggered relays or positive triggers or both? Looking over the items being being used in the fuel injection setup (namely 8 IGN-1A coils) I needed several relays and fused circuits. A couple of the relays would handle quite large current and then I needed one main relay that was ground triggered.

The solution, I picked up a Bussman 15303-2 fuse/relay center for all my positively triggered relays and fuse needs, 4 terminal blocks to provide connectivity to and from the fuse/relay center, two very cool Bussman AMI fuse holders to protect the dual 40A IGN-1A coil circuits, 3 Picker 40A relays (these are mounted to the fender) two for the IGN-1As and one as a main, and a Blue Sea Systems power block to provide power and ground from the battery.

The whole setup is activated using a 40A Picker relay as a main relay, this relay controls all the others and is only energized when the key is on. I also utilized the stock Ford fuel pump inertia switch. This switch can sense impact and it will kill the main relays ground circuit which in turn shuts everything down. This way in a crash my fuel pump, fans, O2 sensor, coils, injectors, etc will all shut down.  

Below is the circuit diagram.


Megasquirt Relay Layout v2

After planning the electrical portion it was time to figure out where to mount this setup. The project that I am building this for has a perfect place, right where the stock air filter box was mounted. ‘Cause who keeps the stock air filter? After choosing the location I figured I needed some nice material to house the components. I picked up some Carbon Fiber from Tim McAmis Performance Parts for the board and then some .125” 6061 Aluminum sheet for the bracket. Then went to work on the CNC router.

Here’s a couple of quick videos showing the Carbon Fiber cut and the aluminum cut.

While the Carbon Fiber is trick, it’s not as rigid as I’d like so I put use some aluminum stand-offs between it and the bracket for extra strength.

Finished board and bracket. The bracket and stand-offs will be going to the powdercoaters to get a nice semi-gloss black coating.

20171028_024545405_iOS

20171024_032124656_iOS

20171024_032214837_iOS


All mounted up in the truck. 

20171028_215221242_iOS

20171028_222317939_iOS


Parts list:

Real Carbon Fiber 

Bussman 15303-2 if you want to assemble it yourself or pick up a pre-populated unit from Concours Specialties

Blue Sea Systems Dualbus Plus Stud, Screw Terminal

Bussman 5 terminal 30A blocks

Bussman 2 terminal 75A block

Bussman AMI fuse holders

Carbon fiber sheet

.125” 6061 aluminum sheet

Destiny Viper end mill

1.25 LED” voltmeter

Aluminum stand-offs


It’s here! Part 1 how to Display Data Over a CAN bus From Your Megasquirt or Microsquirt

An alternative to tablets and PCs

One of the cool things about the Megasquirt fuel injection system is its ability to broadcast data over a CAN bus. This is exactly how OEM automotive systems connect all the different vehicle control systems in modern vehicle and provides a very flexible platform for aftermarket connectivity as well.

1st let’s quickly go over, at a high level, what CAN bus is and how it operates. CAN is a multi-master serial bus standard for connecting vehicle subsystems (e.g. a vehicle’s ECU is a subsystem or node).  There’s physical aspects and software aspects. Wiring (a physical aspect) is generally a twisted pair with a 120Ω resistor at each end of the bus. This is important to note as improperly located or missing resistors will cause issues. The CAN protocol is one of the software aspects. The Megasquirt firmware uses an 11-bit protocol (for basic dash broadcasting) and a proprietary 29bit protocol for more in-depth communication between Mega/Microsquirt devices. For example, a Megasquirt unit controlling the engine and a Microsquirt controlling the transmission.

After soaking this information in I wanted to make use of what I feel is a very robust and reliable way to transfer data out of the Megasquirt or Microsquirt controller and display that in a useful manner. There are plenty of tablet based projects running Raspberry Pi or simply a full-blown Windows or Linux tablet, but I like the simple aspect of no operating system in between. It’s pretty much just data out of the controller and straight to the display no boot times, crashes, patching, etc., etc.

Unfortunately, it’s not as simple as broadcasting the CAN data out and picking that up with the display. There’s a few more pieces you’ll need. 1st you will need a CAN transceiver, this converts the CAN data in to a serial stream. For this I used an inexpensive Waveshare CAN transceiver from Amazon. Then you’ll need something to manipulate the data so your display can show it in an understandable format. I used a Teensy 3.2 microcontroller. The Teensy is an awesome little microcontroller that works with Arduino programming software.  And finally, you will need the display device itself so I tried out the Nextion 3.2” touch screen display. I like the Nextion as it offloads a lot of the processing load of the display from the microcontroller and is very easy to program, plus it is a touchscreen.

As you can see there’s going to be a few items with learning curves if you’ve never touched this stuff before. But the Arduino IDE and Nextion software are very easy to learn. This was my very first project with all of it!

Project in action. This is a simple video showing some of the different aspects of the operation. Visually still a work in progress, but this will help you get an idea of what you can do. You’ll find that the graphics are by far the item you’ll spend the most time on.

Here is the full parts list:

  1. Nextion 3.2″ TFT Display
  2. Waveshare CAN transceiver
  3. Teensy 3.2 Arduino compatible micro-controller
  4. Microsquirt v3 cased

Arduino sketch


#include 
#include 

FlexCAN CANbus(500000);
static CAN_message_t rxmsg;


byte indicator[7]; 
float  BATTV, IAC, dwell, idle_tar, AFRtgt, AFR, newBATTV, oldBATTV;
unsigned int MAP, SPKADV, RPM, TPS, MAT, CLT, injduty, Baro, PW1, nexAFR, nexCLT;

void setup() {


  CANbus.begin();


  Serial2.begin(115200);
}


void loop(void) {


  gauge_display();


  if ( CANbus.read(rxmsg) ) {
    switch (rxmsg.id) { 
      case 1520: 
        RPM = (float)(word(rxmsg.buf[6], rxmsg.buf[7]));
        PW1 = (float)(word(rxmsg.buf[2], rxmsg.buf[3]));
        injduty = ((PW1 / 1000 * RPM / 120) / 10);
        break;
      case 1521: 
        SPKADV = (float)(word(rxmsg.buf[0], rxmsg.buf[1]));
        indicator[0] = rxmsg.buf[3]; 
        AFRtgt = (float)(word(0x00, rxmsg.buf[4]));
        break;
      case 1522: 
        Baro = (float)(word(rxmsg.buf[0], rxmsg.buf[1]));
        MAP = (float)(word(rxmsg.buf[2], rxmsg.buf[3]));
        MAT = (float)(word(rxmsg.buf[4], rxmsg.buf[5]));
        CLT = (float)(word(rxmsg.buf[6], rxmsg.buf[7]));
        nexCLT = (float)(word(rxmsg.buf[6], rxmsg.buf[7]));

        break;
      case 1523: 
        TPS = (float)(word(rxmsg.buf[0], rxmsg.buf[1]));
        BATTV = (float)(word(rxmsg.buf[2], rxmsg.buf[3]));
        AFR = (float)(word(rxmsg.buf[4], rxmsg.buf[5]));
        nexAFR = (float)(word(rxmsg.buf[4], rxmsg.buf[5]));
        break;
      case 1524: 
        break;
      case 1526: 
        IAC = (float)(word(rxmsg.buf[6], rxmsg.buf[7])); //IAC = (IAC * 49) / 125;
      case 1529: 
        dwell = (float)(word(rxmsg.buf[4], rxmsg.buf[5]));
        break;
      case 1530: 
        indicator[1] = rxmsg.buf[0]; 
        indicator[2] = rxmsg.buf[1]; 
        indicator[3] = rxmsg.buf[2]; 
        indicator[6] = rxmsg.buf[6]; 
        indicator[7] = rxmsg.buf[7]; 
        break;
      case 1537: 

        break;
      case 1548: 
        idle_tar = (float)(word(rxmsg.buf[0], rxmsg.buf[1]));
        break;
      case 1551: 
        break;
      case 1574: 
        indicator[4] = rxmsg.buf[2]; 
        break;

    }


  }
}

elapsedMillis DisplayTime; 

void gauge_display() {  

  if ( DisplayTime < 150 ) return;
  DisplayTime = 0;


  Serial2.print("t3.txt=");
  Serial2.write(0x22);
  Serial2.print(SPKADV / 10);
  Serial2.write(0x22);
  Serial2.write(0xff);
  Serial2.write(0xff);
  Serial2.write(0xff);


  Serial2.print("t4.txt=");
  Serial2.write(0x22);
  Serial2.print(MAP / 10);
  Serial2.write(0x22);
  Serial2.write(0xff);
  Serial2.write(0xff);
  Serial2.write(0xff);


  Serial2.print("j6.val=");
  Serial2.print(nexAFR / 2); 
  Serial2.write(0xff);
  Serial2.write(0xff);
  Serial2.write(0xff);

  Serial2.print("t14.txt=");
  Serial2.write(0x22);
  Serial2.print(AFR / 10);
  Serial2.write(0x22);
  Serial2.write(0xff);
  Serial2.write(0xff);
  Serial2.write(0xff);


  if ((AFR / 10 < 10.5) && (AFR / 10 > 10) && (TPS / 10 > 80))
    gauge_display_AFR_YELLOW();

  if ((AFR / 10 < 10.0) && (TPS / 10 > 80))
    gauge_display_AFR_RED();

  if ((AFR / 10 < 12.5) && (AFR / 10 > 10.5) && (TPS / 10 > 80))
    gauge_display_AFR_BLACK();

  if ((AFR / 10 > 12.5) && (TPS / 10 > 80))
    gauge_display_AFR_RED();


  Serial2.print("j2.val=");
  Serial2.print(injduty);
  Serial2.write(0xff);
  Serial2.write(0xff);
  Serial2.write(0xff);

  Serial2.print("t15.txt=");
  Serial2.write(0x22);
  Serial2.print(injduty);
  Serial2.write(0x22);
  Serial2.write(0xff);
  Serial2.write(0xff);
  Serial2.write(0xff);


  if (injduty < 60)
    gauge_display_injduty_black();

  if ((injduty >= 60) && (injduty < 79))

    gauge_display_injduty_yellow();

  if (injduty > 79)

    gauge_display_injduty_RED();


  Serial2.print("j3.val=");
  Serial2.print(TPS / 10);
  Serial2.write(0xff);
  Serial2.write(0xff);
  Serial2.write(0xff);

  Serial2.print("t16.txt=");
  Serial2.write(0x22);
  Serial2.print(TPS / 10);
  Serial2.write(0x22);
  Serial2.write(0xff);
  Serial2.write(0xff);
  Serial2.write(0xff);


  newBATTV = BATTV / 10;
  if ( newBATTV != oldBATTV )
    gauge_display_BATTV();

  Serial2.print("t8.txt=");
  Serial2.write(0x22);
  Serial2.print(MAT / 10);
  Serial2.write(0x22);
  Serial2.write(0xff);
  Serial2.write(0xff);
  Serial2.write(0xff);


  Serial2.print("t0.txt=");
  Serial2.write(0x22);
  Serial2.print(RPM);
  Serial2.write(0x22);
  Serial2.write(0xff);
  Serial2.write(0xff);
  Serial2.write(0xff);

  Serial2.print("j5.val=");
  Serial2.print(RPM / 100);
  Serial2.write(0xff);
  Serial2.write(0xff);
  Serial2.write(0xff);


  if (RPM < 5000)
    gauge_display_RPM_BLACK();

  if ((RPM > 5000) && (RPM < 6000))
    gauge_display_RPM_YELLOW();

  if ((RPM > 6000))
    gauge_display_RPM_RED();


  Serial2.print("t17.txt=");
  Serial2.write(0x22);
  Serial2.print(CLT / 10);
  Serial2.write(0x22);
  Serial2.write(0xff);
  Serial2.write(0xff);
  Serial2.write(0xff);

  Serial2.print("j4.val=");
  Serial2.print(nexCLT / 20);
  Serial2.write(0xff);
  Serial2.write(0xff);
  Serial2.write(0xff);
}


void gauge_display_injduty_black() {

  Serial2.print("j2.pco=BLACK");
  Serial2.write(0xff);
  Serial2.write(0xff);
  Serial2.write(0xff);

  Serial2.print("t15.pco=BLACK");
  Serial2.write(0xff);
  Serial2.write(0xff);
  Serial2.write(0xff);
}

void gauge_display_injduty_yellow() {

  Serial2.print("j2.pco=YELLOW");
  Serial2.write(0xff);
  Serial2.write(0xff);
  Serial2.write(0xff);

}

void gauge_display_injduty_RED() {

  Serial2.print("j2.pco=RED");
  Serial2.write(0xff);
  Serial2.write(0xff);
  Serial2.write(0xff);

}

void gauge_display_BATTV() {

  oldBATTV =
    Serial2.print("t6.txt=");
  Serial2.write(0x22);
  Serial2.print(BATTV / 10);
  Serial2.write(0x22);
  Serial2.write(0xff);
  Serial2.write(0xff);
  Serial2.write(0xff);

}

void gauge_display_RPM_BLACK() {


  Serial2.print("t0.pco=BLACK");
  Serial2.write(0xff);
  Serial2.write(0xff);
  Serial2.write(0xff);

  Serial2.print("j5.pco=BLACK");
  Serial2.write(0xff);
  Serial2.write(0xff);
  Serial2.write(0xff);

}

void gauge_display_RPM_YELLOW() {

  Serial2.print("t0.pco=YELLOW");
  Serial2.write(0xff);
  Serial2.write(0xff);
  Serial2.write(0xff);

  Serial2.print("j5.pco=YELLOW");
  Serial2.write(0xff);
  Serial2.write(0xff);
  Serial2.write(0xff);

}

void gauge_display_RPM_RED() {

  Serial2.print("t0.pco=RED");
  Serial2.write(0xff);
  Serial2.write(0xff);
  Serial2.write(0xff);


  Serial2.print("j5.pco=RED");
  Serial2.write(0xff);
  Serial2.write(0xff);
  Serial2.write(0xff);

}

void gauge_display_AFR_RED() {


  Serial2.print("j6.pco=RED");
  Serial2.write(0xff);
  Serial2.write(0xff);
  Serial2.write(0xff);

}

void gauge_display_AFR_YELLOW() {


  Serial2.print("j6.pco=YELLOW");
  Serial2.write(0xff);
  Serial2.write(0xff);
  Serial2.write(0xff);

}

void gauge_display_AFR_BLACK() {

  Serial2.print("j6.pco=BLACK");
  Serial2.write(0xff);
  Serial2.write(0xff);
  Serial2.write(0xff);

}