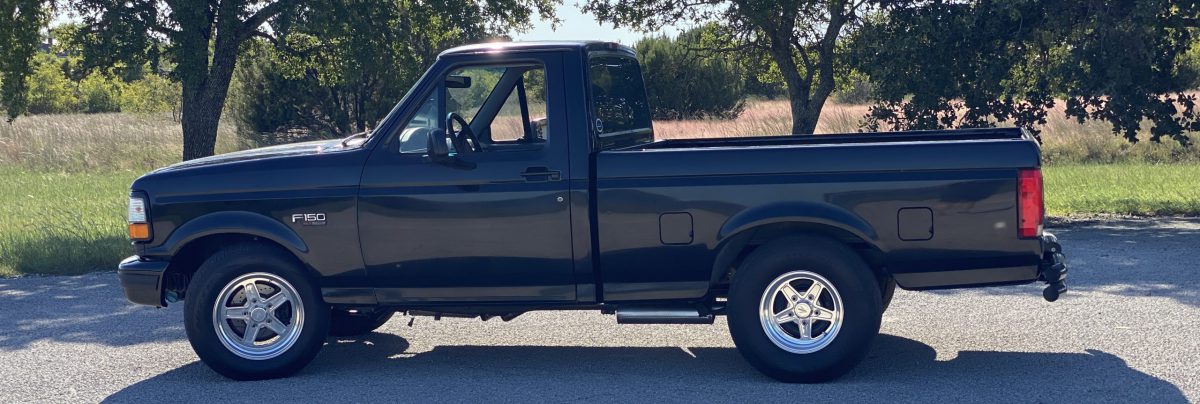
After 19 years of being apart, it’s finally running! 1995 Ford F-150 Lightning 427w small block Ford, Megasquirt MS3/3X v 3.57, distributorless coil near plug, ID 1700 injectors, E4OD using Quick 4, etc, etc
Tag: ford
Please Help Save the NLOC
The NLOC has been around over 20 years and has been instrumental in developing an awesome community around both Generation 1 and 2 Ford Lightning trucks. We are trying to raise enough money to purchase the site content, domain name, software upgrades,and 2 years worth of web hosting. This will ensure the NLOC stays around for future Lightning owners!
Modify a Small Block Ford Timing Cover for Supercharger Oil Drain
It’s been a while!!! I apologize for the lack of activity. The usual excuses apply, work, school, family etc.
Anyway, I wanted to do a quick write up on my blower oil drain setup.
Talking with several folks over on the NLOC one of the best (and cleanest) ways to run a supercharger oil drain line is back to the timing cover.
This mod does require extra disassembly, but because the engine was already out of the truck it was quite easy.
The Steps:
1. Locate the proper fitting for the timing cover, picked this up from Summit
2. Get the proper 7/16th drill bit and ¼” NPT tap
3. Make sure your timing cover is nice and clean, I decided to drill and tap the hole in an existing boss in the timing cover. Also, be sure to completely clean all the drill and tap shavings, the timing cover is aluminum so I simply used water and then compressed air to dry it.


4. Finally, all you need to do is lightly apply thread sealant and tighten down the fitting!


Finished! Custom Carbon Fiber Fuse/Relay Center With 6061 Aluminum Bracket
After deciding to not share any of the stock vehicle wiring with the Megasquirt Fuel Injection system being installed in my 1995 Lightning project it was time to build a custom fuse and relay center. There really were no affordable off the shelf setups so I began piecing one together that met my needs. 1st and foremost you need to properly plan for two items. One, what is the total amount of current you will run through the setup and two will you be using negative triggered relays or positive triggers or both? Looking over the items being being used in the fuel injection setup (namely 8 IGN-1A coils) I needed several relays and fused circuits. A couple of the relays would handle quite large current and then I needed one main relay that was ground triggered.
The solution, I picked up a Bussman 15303-2 fuse/relay center for all my positively triggered relays and fuse needs, 4 terminal blocks to provide connectivity to and from the fuse/relay center, two very cool Bussman AMI fuse holders to protect the dual 40A IGN-1A coil circuits, 3 Picker 40A relays (these are mounted to the fender) two for the IGN-1As and one as a main, and a Blue Sea Systems power block to provide power and ground from the battery.
The whole setup is activated using a 40A Picker relay as a main relay, this relay controls all the others and is only energized when the key is on. I also utilized the stock Ford fuel pump inertia switch. This switch can sense impact and it will kill the main relays ground circuit which in turn shuts everything down. This way in a crash my fuel pump, fans, O2 sensor, coils, injectors, etc will all shut down.
Below is the circuit diagram.

After planning the electrical portion it was time to figure out where to mount this setup. The project that I am building this for has a perfect place, right where the stock air filter box was mounted. ‘Cause who keeps the stock air filter? After choosing the location I figured I needed some nice material to house the components. I picked up some Carbon Fiber from Tim McAmis Performance Parts for the board and then some .125” 6061 Aluminum sheet for the bracket. Then went to work on the CNC router.
Here’s a couple of quick videos showing the Carbon Fiber cut and the aluminum cut.
While the Carbon Fiber is trick, it’s not as rigid as I’d like so I put use some aluminum stand-offs between it and the bracket for extra strength.
Finished board and bracket. The bracket and stand-offs will be going to the powdercoaters to get a nice semi-gloss black coating.
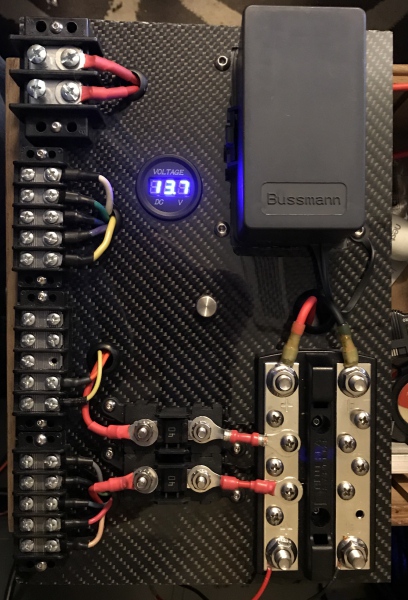


All mounted up in the truck.


Parts list:
Bussman 15303-2 if you want to assemble it yourself or pick up a pre-populated unit from Concours Specialties
Blue Sea Systems Dualbus Plus Stud, Screw Terminal
Coming Soon!
Part 1 of a 2 part series Megasquirt CAN based gauges using a Nextion touch screen display. Part 2 will show a custom enclosure with 3 Nextion displays!!!
[wpdevart_youtube]8Kek2j2CPKg[/wpdevart_youtube]
Affordable, solid performer, made in the USA, what more can you ask for? Here’s the full review
Turns out it was worth it
Raychem heat shrink boot worked out pretty well. Now each wiring branch is all sealed up and safe.


I hope this thing is worth it…
Needed a good way to seal up the branches of my wiring harness. Raychem seems to be the only game in town for quality Made in USA heat shrink boots, but $31.00 ugh! Pics soon™


Wiring has started…
Spent the day trying not to burst in to flames, OMG hot! Managed to make a little progress on the engine bay wiring.
Started with this.

Mid way through, closeups of injector and coil connectors.


Testing placement, loom and other cleanup will be later

From fancy Delphi to something that just works…
Originally I spent a pile of money on a fancy Delphi “mil-spec” connector to run my Megasquirt. Just ended up getting frustrated with the quality of some of the tools (I am looking at you stupid plastic pin remover that I bought like 4 times…) and overall price of the parts.

So now I am simply going to run the Megasquirt harness straight from the Megasquirt in the truck to Weather/Metripack connectors in the engine bay using this simple, but effective firewall grommet.

